Sharing your iPhone? Adding another face to Face ID makes access easier, but it's crucial to understand the security implications. This guide provides step-by-step instructions alongside essential security considerations to help you make an informed decision.
Adding a Second Face to Your iPhone: A Step-by-Step Guide
Remember, you can only add one additional face to your iPhone's Face ID. This means only one other person can unlock your device using facial recognition.
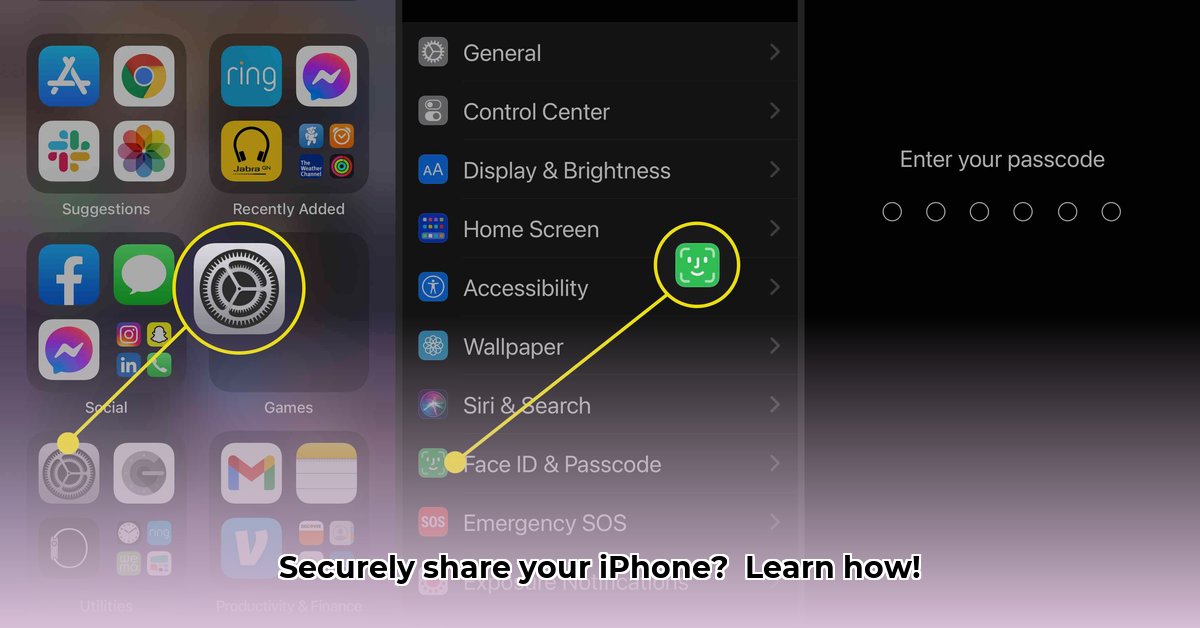
- Open Settings: Find the grey gear icon and tap it.
- Access Face ID & Passcode: Scroll down and tap "Face ID & Passcode." You'll need to authenticate with your existing passcode.
- Set Up an Alternate Appearance: Tap "Set Up an Alternate Appearance."
- Scan the Second Face: Follow the on-screen prompts to scan the second person's face. Ensure good lighting and a clear view of their face. Multiple scans might be needed for optimal recognition.
- Confirmation: Once the scan is complete, test the new Face ID to ensure it works correctly.
Security Implications: Understanding the Risks
Adding another face grants this person complete access to your iPhone's data – photos, messages, emails, apps, and more. Before proceeding, carefully consider these risks:
- Unrestricted Access: The secondary user has full control over your device and all its contents. This is equivalent to giving away the keys to your house and all its valuables. Do you trust this person implicitly?
- Privacy Vulnerability: Sharing your iPhone's Face ID with someone you don't completely trust significantly increases the risk of privacy breaches. Think about the sensitive information on your phone.
- The Importance of a Strong Passcode: A strong, complex passcode acts as a crucial backup security measure. If your Face ID is compromised, a strong passcode protects your data.
Mitigating Risks: Safeguarding Your Information
While you can't eliminate all risks, you can minimize them:
- Choose Wisely: Only add a trusted individual's face to your iPhone. This isn't a decision to be made lightly.
- Robust Passcode: Create a strong, memorable passcode that's difficult to guess. Consider using a combination of uppercase and lowercase letters, numbers, and symbols. This is your last line of defense.
- App-Specific Restrictions (Consider using parental controls): Explore options within specific apps to restrict access to sensitive information for the secondary user. For instance, some banking apps allow for fingerprint or face ID authentication but also require an additional passcode.
Alternatives to Shared Face ID: Prioritizing Privacy
For enhanced security, consider these alternatives:
- Separate Apple IDs: Each user maintains their own Apple ID, ensuring complete data separation. This is like having separate houses, preventing access to one another's data.
- Passcode-Only Access: For situations requiring stricter control, rely exclusively on your passcode. Let your family members know they would need to enter the passcode to access the iPhone. This keeps the secondary user locked out from data access.
Troubleshooting Common Issues
- Face Not Recognized: Ensure sufficient lighting and follow the on-screen instructions carefully. Rescan the face if necessary, making sure the face is clearly visible, without any obstructions.
- Errors During Setup: Restart your iPhone. If the problem persists, contact Apple Support.
Adding another face to your Face ID offers convenience, but security is paramount. Weigh the benefits against the potential risks carefully. Remember, your personal information is valuable – protect it wisely. A strong passcode is your backup protection – treat it as such!.
LSI Keywords:
iPhone Face ID, Add Face ID, Alternative Appearance, iPhone Security, Face ID Security, Shared iPhone, Data Privacy, Passcode Security, Apple ID, iPhone Access, Secure Setup, Data Protection, Family Sharing, Multiple Users, Privacy Risks, Trustworthiness, Strong Passcode, Two-Factor Authentication, Biometric Security.